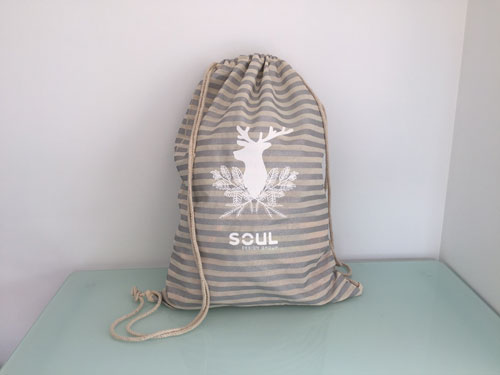
Thought it would be fun to screen print some custom designed Santa Sacks.
There’s lots of You Tube videos to show you how this can be done. There’s different ways of doing it ie. use the sunlight to burn the design or a light.
This is just one of the video’s I found useful.
I suggest you watch it first and can follow his method or if using a 500 watt halogen light follow the steps below.
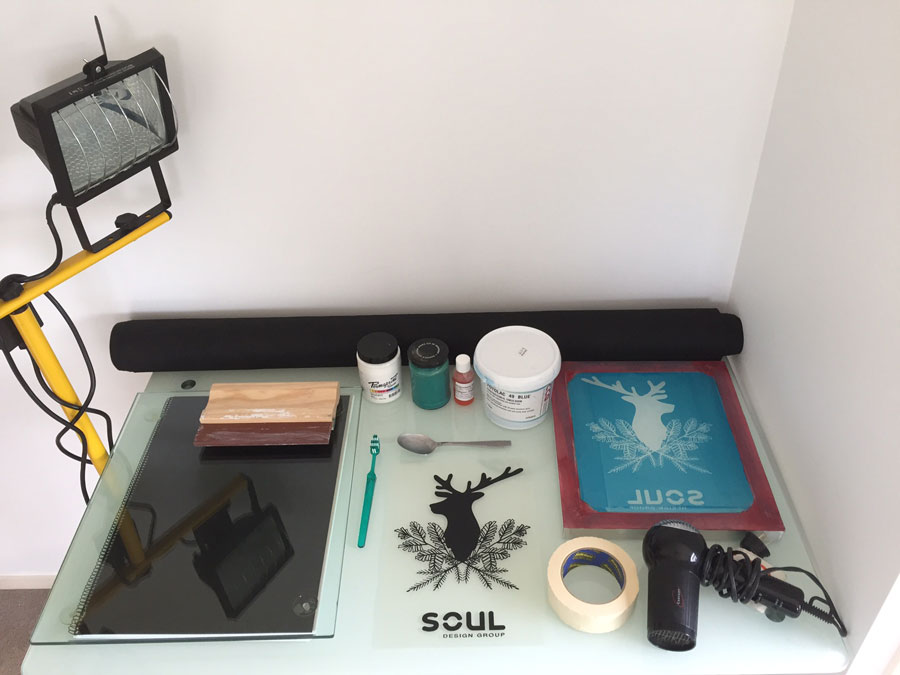
Supplies Needed:
I sourced most of my supplies through Gordon Harris and if you can’t print on transparency stock you could take your design on a usb stick to somewhere like Warehouse Stationery and they could print it for you.
Silkscreen frame
Squeegee
Transparency stock
Glass
Black card
Masking tape
Blow dryer (or similar)
Screen Print Emulsion
Fabric Paint
Toothbrush
Spoon
2 small pieces of wood
Newspaper
Pressure Hose attachment or similar
Dark room
500 watt halogen floodlight/lamp
Santa sacks
Step 1
Print black design on a clear transparency stock. (I made 2 copies to make it as dark as possible and then cellotaped them together – but 1 copy will do). That will be used to burn your design into the silkscreen.
Step 2
I used a ready made metal silkscreen frame but you could make your own from wood or a picture frame and staple silkscreen cloth to it.
Step 3
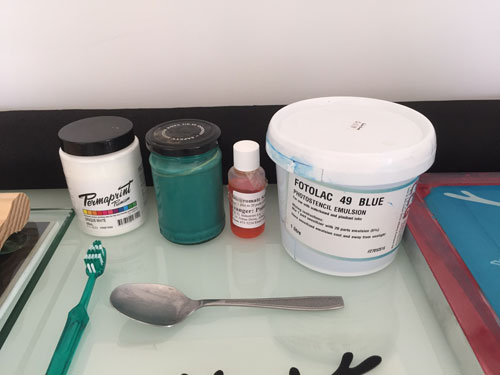
In a dark room, mix screenprint emulsion. The tub of “Fotolac 49 Blue” (right) emulsion came with a little bottle of orange coloured sensitizer (second from right).
In a small jar (second from left) I mixed 1 part sentsitizer to 20 parts emulsion. Don’t expose this to the sunlight!!
Note:
To darken the room I used some black weed mat that I covered the windows with to black out the natural light.
Step 4
Prepare a place in a dark cupboard that you can put your emulsion coated screenprint frame on.
Lay some newspaper on the cupboard shelf and also 2 small bit of wood that can rest the frame on, raised off the newspaper.
Step 5
In a dark room, lay newspaper on a table. Get the frame and ensure the silk screen is clean free of any small bits of dirt/objects.
Step 6
Give the jar of mixed emulsion formula a good stir (remember not to expose it to light).
Get the squeegee ready.
Pour a thick amount of emulsion mixture in a line along the top front of the screen (the flush side).
Use the squeegee to spread it down and all over the front of the screen then turn it over and spread the squeegee on the other side. Put any excess emulsion back into jar and repeat this process until the emulsion is spread evenly on both sides and it has a smooth finish. End up with your last squeegee smoothing pass on the inside of the frame (not the flush side).
Step 7
Place frame on shelf in the dark cupboard with the edges on top of the wooden pieces (flush side facing towards bottom of shelf).
Leave overnight to dry.
Store the emulsion in dark place for next time. Rinse squeegee in water to clean.
Step 8
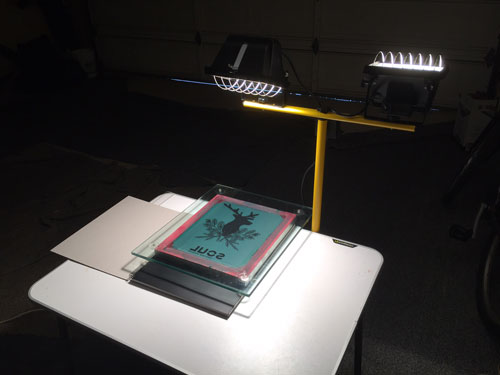
Once the emulsion is dry it’s time to burn the design into the silkscreen.
I did this also in a dark room so the light would not interfere with burn time.
Place a black board or card on the table. The cover of one of my blank sketch books was black so I used that and it was the exact size under the frame. (the natural card in the photo is under the black sketch book so just ignore that)
Put the dried emulsion covered frame on top of the black board (flush side up)
Position 500 watt light directly above the frame (about 40cm above frame). I have a double floodlight so I turned one up and faced the other one down over the frame.
Center the transparency on top of the frame leaving a bit of room at the top and bottom to pour the paint on at the top. (IMPORTANT: If there is text in the design ensure you put the transparency so it reads backwards/reversed)
Cover the transparency with a thick clean piece of clear glass. (you may be able to use photo frame glass. I used a heavy piece from a small table)
Step 9
Burn the design:
For my method using a 500 watt halogen lightbulb I turned the light on and exposed it to burn for 12 and a half minutes EXACTLY.
I used the stopwatch on my iphone to time it. If you leave it too long or too short then it may not wash out properly.
Step 10
Turn off light and remove transparency. You should see on the screen your design faintly in a different colour to the emulsion.
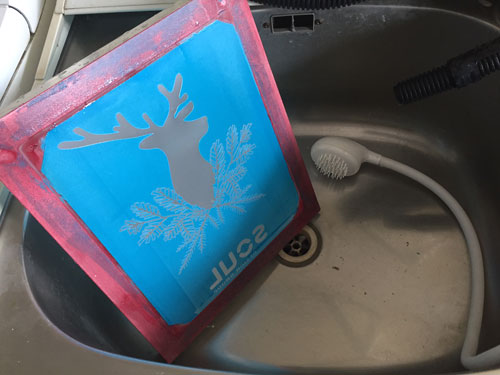
Take the screen to the sink. Wash both sides of the frame and you’ll start to see the design wash out. After both sides are wet, you could use a high powered spray hose, in my case I connected a hand held spray hose to the tap and turned the water on high pressure and washed it over the screen. You’ll notice the design gradually appear as the emulsion washes out. For any stubborn or intricate parts of the design, I used a toothbrush and gentally brush over the design.
Step 11
Leave frame to dry. Once dried cover the entire edges of the frame in masking tape on both sides.
Step 12

Ready to print… Get a piece of foam board or something similar to put material you will print on over. I slipped the sacks over the heavy glass I used and wrapped the sack tightly around it centering where I wanted to put the print. The material needs to be tight against the surface without room for movement. Maybe bulldog clips or something similar might be helpful to hold it in place.
Get the water based screen printing fabric paint – I used Permaprint Premium Opaque white.
Stir the paint. Get a dessert spoon and scoop some paint out and spread it on the inside of the frame along the top of the burnt design. Make sure you have a generous amount on the screen. Then take the squeegee and lightly spread the paint down over the design so it’s completely covered. Once it’s completely covered do heavier passes over the design with the squeegee. Repeat this movement until you a happy there is enough paint on the material. Do one last final light pass and then take the frame off the material.
Scrape any excess paint off the frame and put back into the paint tub.
If you have multiple things to print do them one after the other then be sure to wash out the screen quickly with cold to tepid water. DO NOT use hot water.
Step 13
Use a blow dryer to heat set the paint.